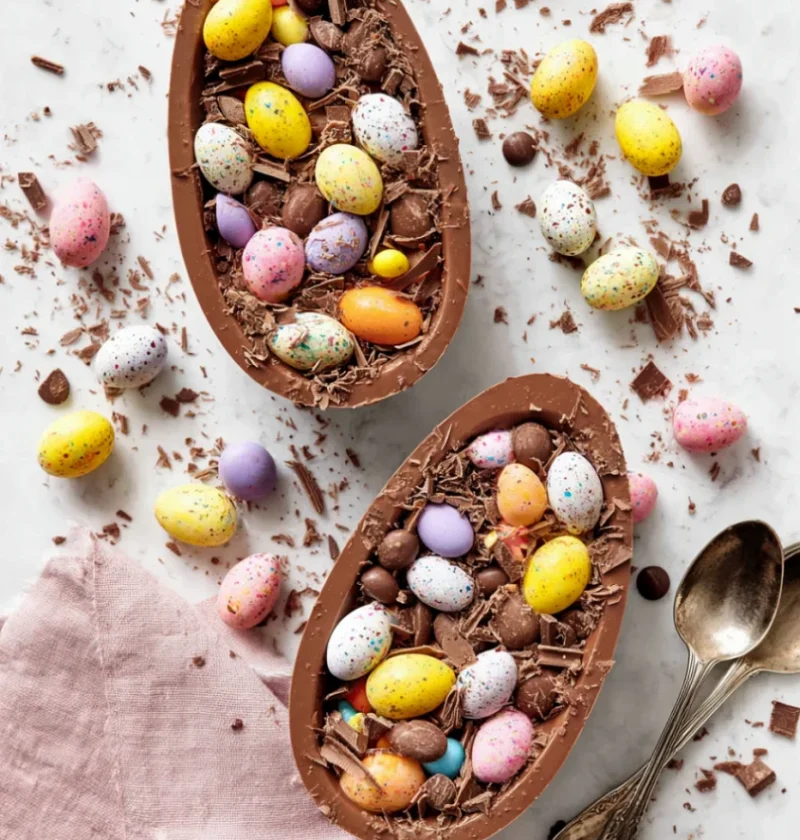
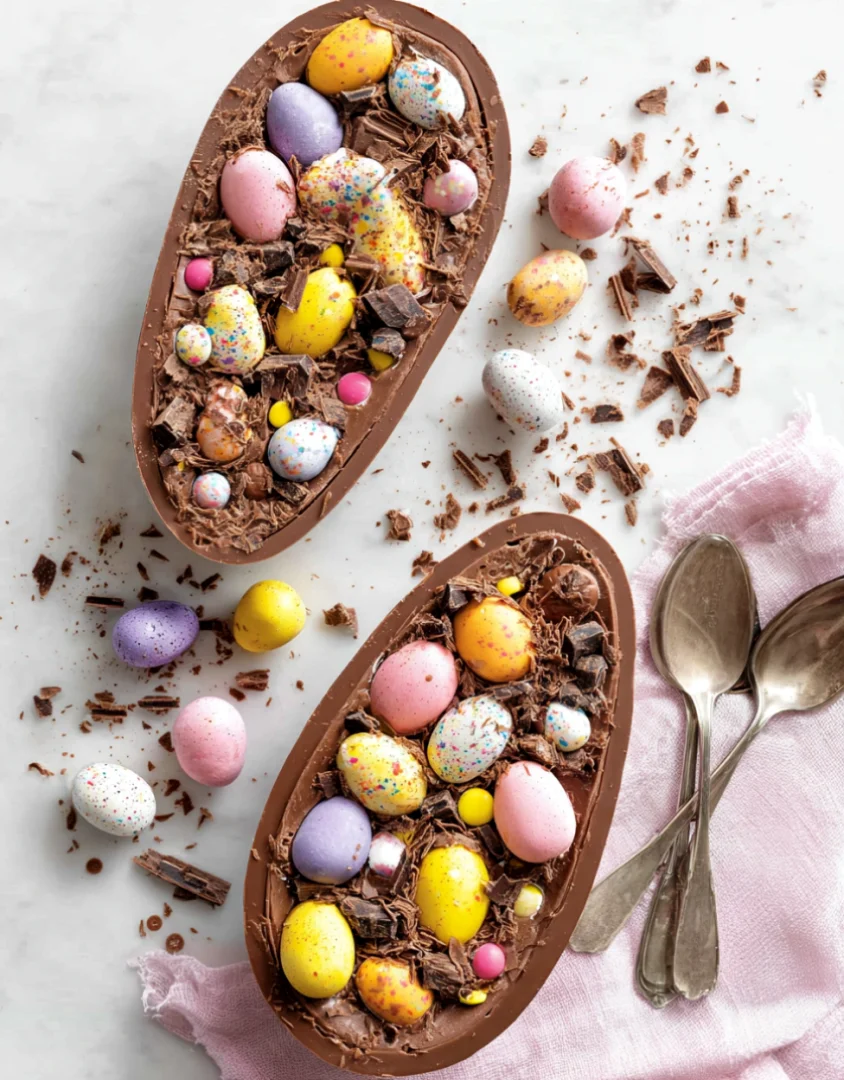
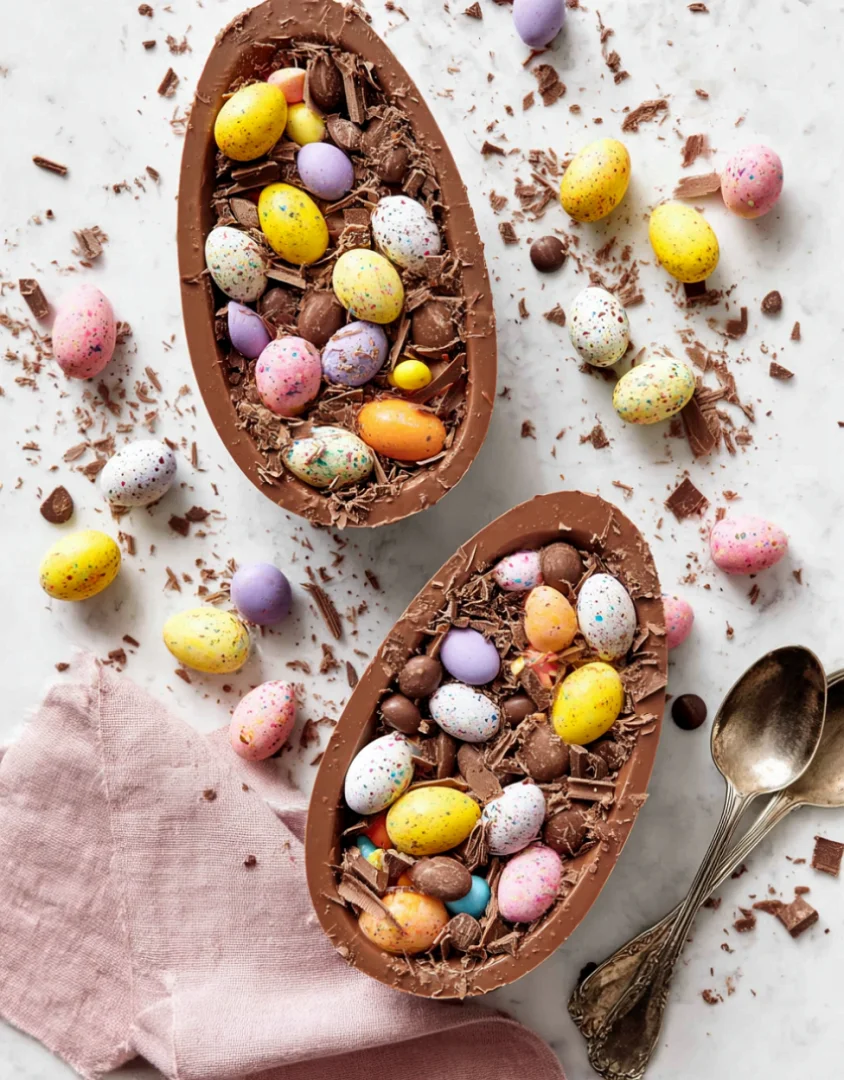
As Easter approaches, the anticipation of festive gatherings and delicious treats fills the air. Among the myriad of sweet delights that grace our tables, the Easter Egg Cheesecake stands out as a show-stopping dessert that captures the spirit of the season. This cheesecake not only delights with its rich, creamy texture but also offers a playful nod to the traditional Easter egg hunt with colorful candy toppings. Imagine a velvety vanilla cheesecake filling, perfectly balanced by a buttery graham cracker crust, topped with vibrant pastel egg-shaped candies. This dessert will surely become a centerpiece at your Easter brunch, bringing joy to both adults and children alike. The tradition of cheesecake dates back to ancient Greece, where it was served to athletes during the Olympic games. However, this modern twist with Easter egg-inspired toppings makes it a unique and festive choice for your holiday celebrations. The incorporation of colorful candies adds an element of fun and whimsy, making every slice a delightful surprise. The blending of flavors and textures in this dessert creates an unforgettable experience for your taste buds.
Ingredients
- For the crust:
- 1 ½ cups graham cracker crumbs
- ½ cup unsalted butter, melted
- ¼ cup granulated sugar
- For the cheesecake filling:
- 24 ounces cream cheese, softened
- 1 cup granulated sugar
- 1 teaspoon vanilla extract
- 1 cup heavy whipping cream
- 1 tablespoon lemon juice
- For the toppings:
- Assorted egg-shaped candy (e.g., chocolate eggs, pastel candy-coated chocolates)
- Fresh fruit (optional, for garnish, such as raspberries or strawberries)
Note: For the best flavor, use high-quality cream cheese and fresh ingredients. Opt for full-fat cream cheese for a richer taste that contributes to a creamier texture in your Easter Egg Cheesecake. If you prefer a gluten-free option, you can substitute the graham cracker crumbs with gluten-free cookies or crushed nuts, such as almonds or pecans. Furthermore, for a dairy-free alternative, consider using a non-dairy cream cheese and whipped coconut cream. These alternatives can still deliver a delicious cheesecake experience without compromising on flavor or texture. When selecting your toppings, consider using a mix of flavors and colors to enhance both the taste and presentation. You can learn more about this topic.
Steps / Instructions
- Prepare the crust: In a medium mixing bowl, combine the graham cracker crumbs, melted butter, and granulated sugar. Mix until the crumbs are evenly coated and resemble wet sand. This step is crucial as it ensures a firm and flavorful base for your Easter Egg Cheesecake. The butter binds the crumbs together and adds richness, while the sugar enhances the sweetness of the crust. Make sure to use a sturdy mixing bowl to prevent any spills during this mixing process.
- Press the crust: Transfer the crumb mixture to a 9-inch springform pan. Using the back of a measuring cup, press it firmly into the bottom and slightly up the sides of the pan. Ensure it is evenly compressed for a sturdy crust. It’s important to create a solid foundation to hold the filling securely, as a well-pressed crust will prevent the cheesecake from crumbling when sliced. Place the crust in the refrigerator to set while you prepare the filling. This chilling helps the butter to solidify, making it easier to slice later and ensuring the crust maintains its shape. Consider placing a piece of parchment paper at the bottom for easier removal.
- Make the cheesecake filling: In a large mixing bowl, beat the softened cream cheese with an electric mixer on medium speed until smooth and creamy, about 2 minutes. Scrape down the sides of the bowl to ensure all the cream cheese is blended evenly, as this prevents lumps in your filling. Properly incorporating the ingredients at this stage contributes to the overall texture, making it more enjoyable.
- Add the sugar and vanilla extract to the cream cheese mixture. Beat until well combined and fluffy, about 2 more minutes. The mixture should be light and airy, indicating a well-aerated batter. This fluffiness is key to achieving that light texture that is characteristic of a classic cheesecake. Pay attention to the consistency; it should be thick yet smooth, which sets the stage for a perfect cheesecake.
- Whip the cream: In another bowl, whip the heavy cream until stiff peaks form. This process will add lightness to your cheesecake filling, significantly contributing to its creamy texture. Look for a consistency where the whipped cream holds its shape when you lift the whisk, which typically takes about 3-5 minutes using an electric mixer on high speed. For best results, ensure that your bowl and beaters are clean and chilled, as this can affect the whipping process.
- Combine mixtures: Gently fold the whipped cream into the cream cheese mixture using a spatula. Be careful not to deflate the whipped cream; this folding technique ensures the filling remains light and fluffy, which is key for a beautiful cheesecake. The gentle motion preserves the airiness that you’ve achieved in the whipped cream. Make sure to fold from the bottom of the bowl upwards, incorporating the ingredients without overworking them.
- Stir in the lemon juice for added flavor and balance. Mix until just combined, as overmixing can lead to a dense texture. The lemon juice not only enhances flavor but also helps to stabilize the filling, creating a harmonious blend of creamy and tangy notes that elevate the overall taste experience. This step is crucial for achieving the right balance of sweetness and acidity.
- Fill the crust: Pour the cheesecake filling into the prepared graham cracker crust, smoothing the top with a spatula. Make sure to spread it evenly to achieve a nice presentation. This is your chance to create a beautifully smooth surface that will hold the toppings nicely. If desired, tap the pan gently on the counter to release any air bubbles trapped in the filling, ensuring a smooth texture throughout.
- Chill: Cover the cheesecake with plastic wrap and refrigerate for at least 4 hours, or overnight, until fully set. The longer it chills, the firmer it will become, allowing for cleaner slices when served. This chilling period is essential as it allows the flavors to meld, resulting in a richer taste. Remember, patience is key here—allowing ample chilling time will significantly enhance your cheesecake.
- Decorate: Before serving, remove the cheesecake from the springform pan. Top with assorted egg-shaped candies and, if desired, fresh fruit for a pop of color. Arrange the toppings in a festive pattern for an attractive finish. This final touch not only enhances the visual appeal but also adds additional flavors and textures to every slice. Consider adding a drizzle of chocolate syrup or a sprinkle of edible glitter for an extra festive touch.
Tips & Tricks
To ensure your Easter Egg Cheesecake turns out perfectly, keep these tips in mind: Check out our related guide for more tips.
- For a smooth filling, make sure your cream cheese is at room temperature before mixing. This prevents lumps and allows for easier blending, creating a silky texture. A good rule of thumb is to remove the cream cheese from the fridge about an hour before you begin preparing.
- To avoid cracks on the surface of your cheesecake, beat the filling on low speed and avoid overmixing. A water bath can also help keep it moist while setting, which can be done by placing the springform pan in a larger pan filled with water. This technique ensures gentle, even cooking and greatly reduces the risk of cracking.
- Store any leftovers in an airtight container in the refrigerator for up to 5 days. This cheesecake actually tastes better the next day as the flavors meld! Consider serving leftovers with a drizzle of chocolate sauce or a fruit compote for a fresh twist that enhances the overall dessert experience. This can breathe new life into your cheesecake and make it feel like a new dessert altogether.
- If you’re short on time, consider making a no-bake version by simply skipping the baking step, as the fridge will set the cheesecake perfectly. This will also save valuable time during the busy Easter preparations, allowing you to enjoy the festivities with less fuss. Just make sure to adjust your chilling time accordingly!
Variations
While the classic version of the Easter Egg Cheesecake is delightful, consider these variations:
- Chocolate Lovers: Incorporate melted chocolate into the filling for a rich chocolate cheesecake. Dark chocolate pairs beautifully with the cream cheese, adding depth to the flavor and making it a luxurious treat. You can also sprinkle chocolate shavings on top for an added touch.
- Fruit-Infused: Swirl in fruit purée, such as raspberry or strawberry, for a fruity twist. This not only enhances the flavor but also adds a splash of color to your cheesecake, making it visually appealing. Fresh fruit can also be used as a topping for a refreshing finish.
- Nutty Crunch: Add crushed nuts into the crust for extra texture and flavor. Pecans, walnuts, or almonds can provide a delightful crunch that complements the creaminess of the filling, creating a satisfying contrast. This can enhance the overall experience with both taste and texture.
Serving Suggestions
Present your Easter Egg Cheesecake beautifully by serving it on a decorative platter. Pair it with a dollop of whipped cream or a scoop of vanilla ice cream for an indulgent treat. Consider garnishing with mint leaves for a refreshing touch that brightens the dish. Complement your dessert with a light, fruity beverage, such as sparkling lemonade or a refreshing iced tea, which will enhance the festive atmosphere of your gathering. This combination of flavors and textures will surely impress your guests, making your Easter celebration truly memorable.
Conclusion
With its creamy texture, vibrant toppings, and festive presentation, the Easter Egg Cheesecake is sure to become a favorite at your holiday gatherings. This recipe combines elements of tradition and creativity, making it a delightful addition to your Easter dessert table. Don’t hesitate to share your experiences and variations in the comments below! Each cheesecake crafted is a unique creation, and we love hearing how you’ve made this recipe your own, adding your personal touch to this beloved dessert.
Easter Egg Cheesecake
This cheesecake not only delights with its rich, creamy texture but also offers a playful nod to the traditional Easter egg hunt with colorful candy toppings.
Ingredients
- 1 ½ cups graham cracker crumbs
- ½ cup unsalted butter, melted
- ¼ cup granulated sugar
- 24 ounces cream cheese, softened
- 1 cup granulated sugar
- 1 teaspoon vanilla extract
- 1 cup heavy whipping cream
- 1 tablespoon lemon juice
- Assorted egg-shaped candy (e.g., chocolate eggs, pastel candy-coated chocolates)
- Fresh fruit (optional, for garnish, such as raspberries or strawberries)
Directions
In a medium mixing bowl, combine the graham cracker crumbs, melted butter, and granulated sugar. Mix until the crumbs are evenly coated and resemble wet sand.
Transfer the crumb mixture to a 9-inch springform pan. Press it firmly into the bottom and slightly up the sides of the pan. Place the crust in the refrigerator to set while you prepare the filling.
In a large mixing bowl, beat the softened cream cheese with an electric mixer on medium speed until smooth and creamy, about 2 minutes.
Add the sugar and vanilla extract to the cream cheese mixture. Beat until well combined and fluffy, about 2 more minutes.
In another bowl, whip the heavy cream until stiff peaks form.
Gently fold the whipped cream into the cream cheese mixture using a spatula.
Stir in the lemon juice for added flavor and balance.
Pour the cheesecake filling into the prepared graham cracker crust, smoothing the top with a spatula.
Cover the cheesecake with plastic wrap and refrigerate for at least 4 hours, or overnight, until fully set.
Before serving, remove the cheesecake from the springform pan. Top with assorted egg-shaped candies and fresh fruit.
Nutrition Facts
Recipe Reviews
- ★★★★★
Excellent recipe!
Leave a Reply
Your email address will not be published. Required fields are marked *
Excellent recipe!