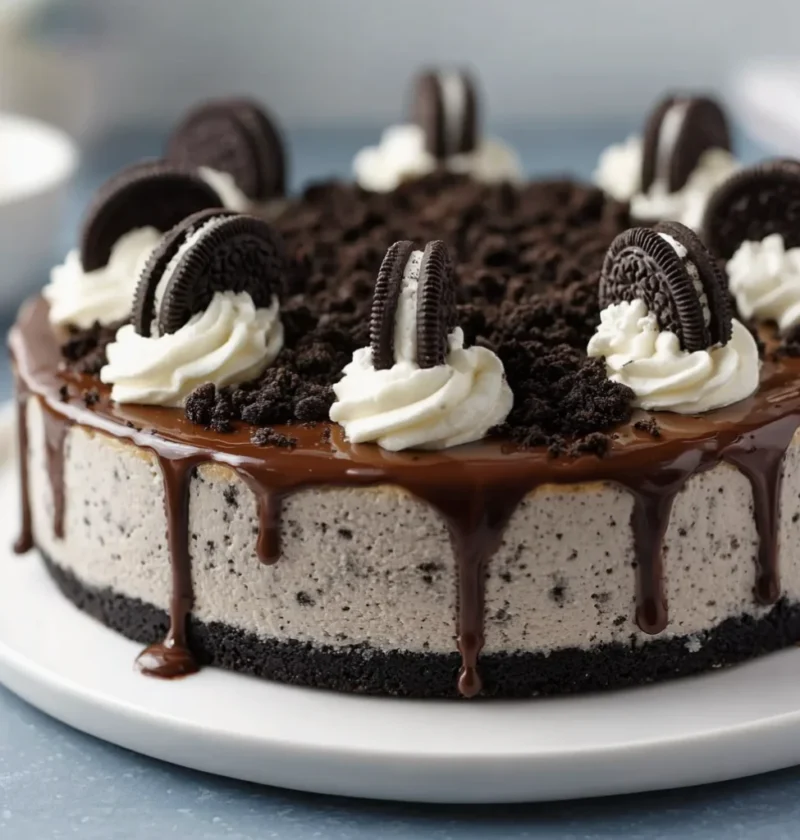
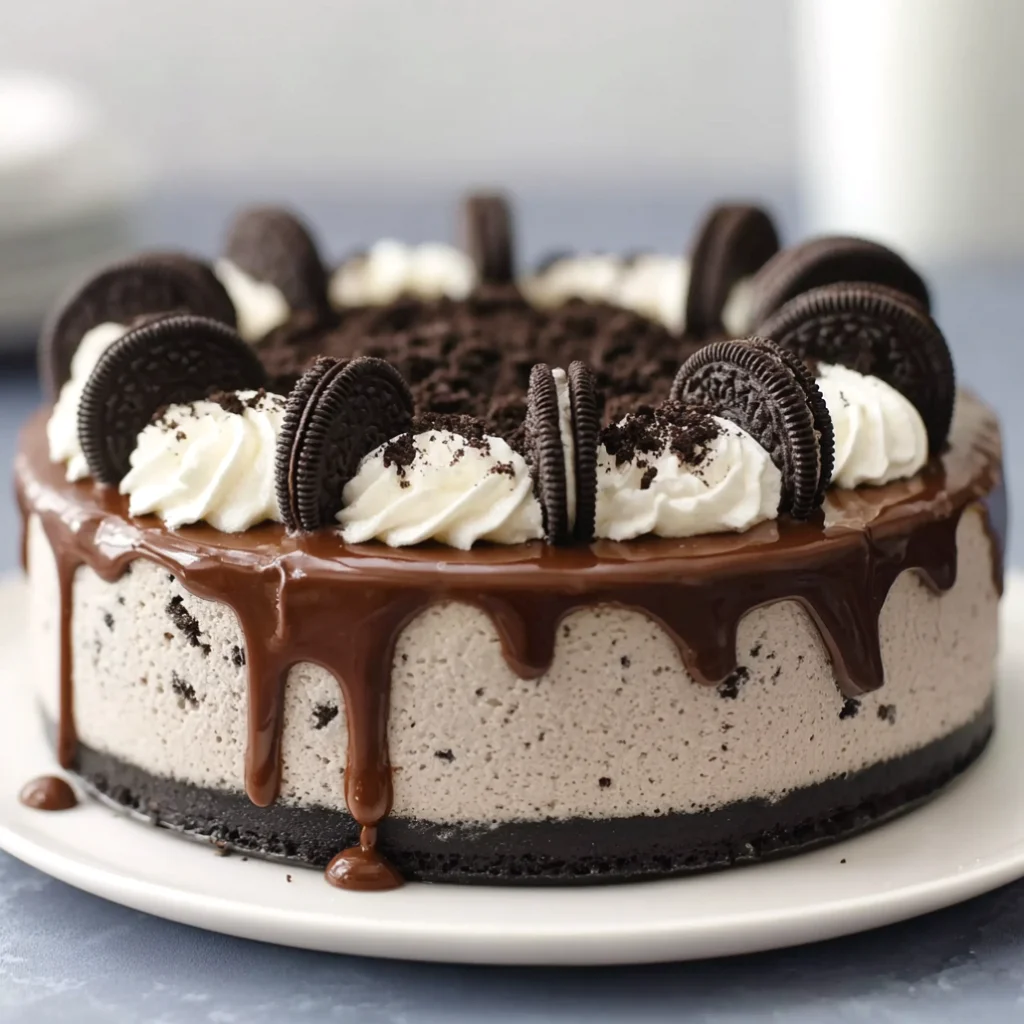
Indulging in a creamy No-Bake Oreo Cheesecake is like taking a bite out of bliss, especially for chocolate lovers. This delightful dessert combines the rich flavors of Oreos and a luscious sweet cream filling, resulting in a chilled treat that’s perfect for any occasion. The balance of creamy and crunchy textures creates an unforgettable experience. Whether you’re hosting a summer barbecue or celebrating a birthday, this easy cheesecake recipe will impress your guests without the need for an oven. It’s an ideal dessert for those who want something special yet simple to prepare. Originating from the classic cheesecake family, the no-bake version allows for a quicker preparation while still delivering the decadent taste that cheesecake enthusiasts adore. Get ready to treat yourself and your loved ones to this irresistible dessert that’s sure to become a family favorite! This No-Bake Oreo Cheesecake not only satisfies your sweet tooth but also provides a delightful visual experience with its layers and garnishes.
Table of Contents
Ingredients
- For the crust:
- 24 Oreo cookies, crushed into fine crumbs. For best results, use a food processor to achieve a fine texture.
- 1/2 cup unsalted butter, melted. Ensure the butter is completely melted for a well-combined crust.
- For the filling:
- 2 cups heavy cream, chilled. Using chilled cream helps achieve the best volume when whipped.
- 16 oz cream cheese, softened at room temperature to avoid lumps during mixing.
- 1 cup powdered sugar, sifted to eliminate any clumps and ensure a smooth consistency.
- 1 teaspoon vanilla extract, which enhances the overall flavor profile of the cheesecake.
- 1 cup crushed Oreo cookies (for mixing into the filling), providing delightful bursts of flavor throughout the cheesecake.
- For the topping:
- Additional crushed Oreos for garnish, preferably larger pieces for added texture. This creates a visually appealing presentation.
- Whipped cream (optional, homemade or store-bought for convenience). A dollop of whipped cream adds an extra creamy layer on top.
Steps / Instructions
- In a medium bowl, combine the crushed Oreo cookies with the melted butter. Mix until the crumbs are evenly coated, ensuring there are no dry spots. This mixture will serve as the delicious base of your cheesecake, creating a flavorful and sturdy foundation.
- Press the Oreos crumb mixture firmly into the bottom of a 9-inch springform pan, creating a smooth and even layer. Use the back of a measuring cup to compact it well, making sure it adheres tightly for a sturdy crust that holds up when slicing.
- In a large mixing bowl, beat the cream cheese until smooth and creamy, using an electric mixer on medium speed for about 2-3 minutes. This step is crucial to ensure the filling is free of lumps and achieves that coveted creamy texture.
- Gradually add the powdered sugar and vanilla extract to the cream cheese, mixing until fully combined and fluffy. The mixture should be light and creamy, indicating that it’s ready for the next step, which is vital for a delightful mouthfeel.
- In a separate bowl, whip the heavy cream until stiff peaks form, which should take about 3-4 minutes on high speed. To check for stiff peaks, lift the beaters; the cream should hold its shape without collapsing, creating a light and airy texture.
- Carefully fold the whipped cream into the cream cheese mixture, being gentle to maintain the airy texture. Use a spatula to fold from the bottom upwards to keep the mixture light and fluffy, ensuring every bite is as decadent as possible.
- Add the crushed Oreo cookies into the filling and gently mix until evenly distributed, ensuring that every slice of the cheesecake has delicious chunks of Oreo for a delightful crunch.
- Pour the filling over the prepared crust in the springform pan, smoothing the top with a spatula to create an even layer. This step is essential for presentation and ensures every slice looks perfect, ready to impress your guests.
- Cover the cheesecake with plastic wrap and refrigerate for at least 4 hours, or preferably overnight, until fully set. The chilling time allows the flavors to meld beautifully and helps the cheesecake firm up, enhancing the overall taste.
- Once set, remove the sides of the springform pan and garnish with additional crushed Oreos and whipped cream on top, if desired. This adds a lovely finishing touch and visual appeal to your No-Bake Oreo Cheesecake, making it even more inviting.
Tips & Tricks
To achieve the best results with your No-Bake Oreo Cheesecake, follow these practical tips: You can learn more about this topic. A few extra pieces of advice can make a significant difference in your final product, ensuring a delicious outcome.
- Use room temperature cream cheese for a smoother filling — this helps avoid lumps and creates a more cohesive texture, resulting in a sublime cheesecake experience.
- For added flavor, consider mixing in a dash of espresso powder with the cream cheese filling. This will enhance the chocolate flavor and add a sophisticated note, elevating the taste even further.
- Store any leftovers in the refrigerator, covered tightly with plastic wrap, for up to 5 days. This dessert can be enjoyed for several days if stored properly, making it a great make-ahead option.
- This cheesecake can be made ahead of time, making it a perfect option for quick desserts for parties. Preparing it the day before frees up time on the day of the event and allows the flavors to develop.
- For a more intense chocolate flavor, you can drizzle melted chocolate on top before serving. Use high-quality chocolate for the best results, and let it cool slightly before drizzling to prevent melting the whipped cream.
Variations and Substitutions
You can make it in a springform pan, pie dish, 9×13 pan, or even as mini jars or frozen mini pies. Some versions use Cool Whip, while others use whipped cream for a slightly different texture.
If you want an extra-decadent topping, add whipped cream swirls and more crushed Oreos. You can also keep the filling a little lighter by folding in less cookie pieces and more cream.
Serving Suggestions
Serve the cheesecake well chilled for the best texture. A little whipped cream and a whole Oreo on each slice make it look bakery-worthy.
This is a great dessert for birthdays, holidays, summer parties, or any time you want a crowd-pleaser. It also works well if you need something you can make the day before.
FAQs
Do I need gelatin?
No, many no-bake Oreo cheesecake recipes set well without gelatin if the filling is mixed and chilled properly.
Can I make it ahead?
Yes, this dessert is designed for advance prep and chilling.
Can I freeze it?
Yes, several versions can be frozen and thawed later in the fridge.
Final Thoughts
No-bake Oreo cheesecake is creamy, rich, and easy to love because it delivers a lot of dessert payoff with very little effort. If you want a crowd-friendly Oreo dessert that doesn’t require baking, this is a strong choice.
Pro Tips
- Use room-temperature cream cheese.
- Chill long enough for firm slices.
- Save extra Oreos for topping.
- Use full-fat ingredients for the best texture.
Common Mistakes
- Using cold cream cheese.
- Not chilling long enough.
- Crumbling the Oreos too finely for the filling.
- Skipping the extra toppings, which add the best finish.
Call to Action
Try this no-bake Oreo cheesecake when you want a simple dessert that looks impressive and tastes like cookies and cream perfection. It’s an easy recipe that Oreo fans will ask for again and again.
Conclusion
Once you’ve tasted this No-Bake Oreo Cheesecake, you’ll understand why it’s a favorite among dessert lovers. Its creamy texture and delightful chocolate cookie crust make it a showstopper at any gathering. Whether it’s a casual family dinner or a festive celebration, this dessert is guaranteed to leave everyone wanting more. Don’t hesitate to share your feedback and let us know how your cheesecake turns out! Check out our related guide for more tips, including ways to elevate your cheesecake experience even further and impress your guests.

No-Bake Oreo Cheesecake
Indulging in a creamy No-Bake Oreo Cheesecake is like taking a bite out of bliss, especially for chocolate lovers. This delightful dessert combines the rich flavors of Oreos and a luscious sweet cream filling, resulting in a chilled treat that's perfect for any occasion. The balance of creamy and crunchy textures creates an unforgettable experience.
Ingredients
- 24 Oreo cookies, crushed into fine crumbs
- 1/2 cup unsalted butter, melted
- 2 cups heavy cream, chilled
- 16 oz cream cheese, softened at room temperature
- 1 cup powdered sugar, sifted
- 1 teaspoon vanilla extract
- 1 cup crushed Oreo cookies (for mixing into the filling)
- Additional crushed Oreos for garnish
- Whipped cream (optional)
Directions
In a medium bowl, combine the crushed Oreo cookies with the melted butter and mix until evenly coated.
Press the Oreo crumb mixture into the bottom of a 9-inch springform pan to create a crust.
In a large mixing bowl, beat the cream cheese until smooth using an electric mixer.
Gradually add the powdered sugar and vanilla extract to the cream cheese, mixing until fluffy.
In a separate bowl, whip the heavy cream until stiff peaks form.
Carefully fold the whipped cream into the cream cheese mixture.
Add the crushed Oreo cookies into the filling and mix gently.
Pour the filling over the prepared crust and smooth the top.
Cover with plastic wrap and refrigerate for at least 4 hours or overnight until set.
Garnish with additional crushed Oreos and whipped cream before serving.
Nutrition Facts
Recipe Reviews
- ★★★★★
Excellent recipe!
Leave a Reply
Your email address will not be published. Required fields are marked *


Excellent recipe!