
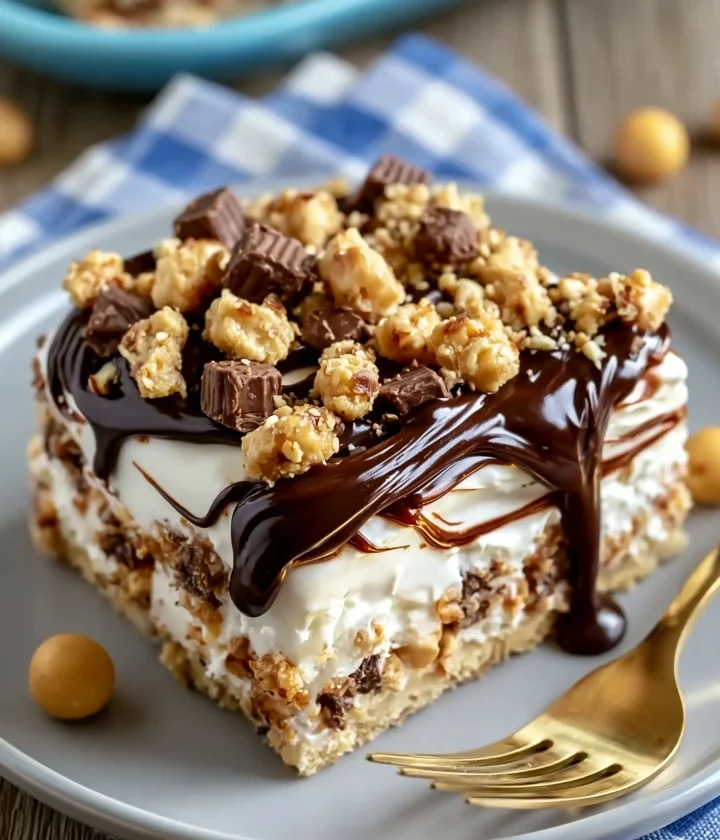
Indulging in a slice of Buster Bar Ice Cream Cake is like taking a delightful journey back to childhood, bringing forth memories of warm summer days and family gatherings. This dessert, inspired by the classic Buster Bar ice cream treat, combines layers of rich chocolate, creamy ice cream, and crunchy toppings that create a perfect balance of sweet and salty. The beauty of this no-bake ice cream cake lies not only in its luscious flavors but also in its easy preparation, making it an ideal addition to any dessert party or festive occasion. Whether you’re a chocolate lover or someone who enjoys a creamy dessert, this cake promises to please everyone at the table. Its versatility allows it to shine at birthday parties, family reunions, or even casual weeknight dinners, ensuring it remains a timeless favorite.
Ingredients
For the Cake Base
- 1 cup of graham cracker crumbs
- 1/4 cup of unsweetened cocoa powder
- 1/2 cup of unsalted butter, melted
- 1/4 cup of granulated sugar
For the Ice Cream Layers
- 4 cups of your favorite ice cream (vanilla, chocolate, or a combination)
- 1 cup of chocolate fudge sauce, plus more for drizzling
For the Whipped Cream Topping
- 2 cups of heavy whipping cream
- 1/4 cup of powdered sugar
- 1 teaspoon of vanilla extract
For the Toppings
- 1/2 cup of chopped nuts (optional)
- 1/2 cup of mini chocolate chips
For the best flavor, choose high-quality ice cream and chocolate fudge sauce. Premium brands often have richer flavors and better textures. You can also substitute with dairy-free options to accommodate dietary preferences, such as coconut or almond milk-based ice creams. You can learn more about this topic.
Steps / Instructions
- Prepare the Cake Base: In a medium bowl, mix together the graham cracker crumbs, cocoa powder, melted butter, and granulated sugar until well combined. The mixture should resemble wet sand, allowing it to easily hold together when pressed.
- Form the Base Layer: Press the mixture into the bottom of a 9-inch springform pan evenly, creating a firm base that will support the layers above. Refrigerate the crust for 30 minutes to set, ensuring it becomes firm and sturdy.
- Add the First Ice Cream Layer: Remove the crust from the refrigerator and scoop half of the ice cream into the pan. Spread it evenly over the crust, ensuring it reaches the edges for a clean look. Drizzle half of the chocolate fudge sauce on top of this layer, allowing the sauce to seep slightly into the ice cream.
- Freeze the Layer: Return the cake to the freezer for about 2 hours or until the ice cream is firm to the touch, ensuring that the layers adhere well to each other.
- Add the Second Ice Cream Layer: Once the first layer is firm, add the remaining ice cream over the fudge sauce and smooth it out with a spatula, creating an even finish. Drizzle with the remaining chocolate fudge sauce, allowing for a rich chocolate experience.
- Final Freeze: Freeze the cake for another 2 hours until completely set, ensuring that each layer is well frozen before serving.
- Whip the Cream: In a large bowl, beat the heavy whipping cream, powdered sugar, and vanilla extract until stiff peaks form. This step is crucial to achieving a light and fluffy texture that contrasts the dense cake.
- Top the Cake: Once the cake is frozen, remove it from the springform pan and place it on a serving plate. Spread the whipped cream evenly over the top and sides of the cake, using a spatula to create a smooth finish.
- Add Toppings: Sprinkle the chopped nuts and mini chocolate chips over the whipped cream, ensuring an even distribution for both flavor and visual appeal. Drizzle with additional chocolate fudge sauce for an extra indulgent touch.
- Serve: Slice and serve immediately. Store any leftovers in the freezer for up to a week, making sure to cover it well to prevent freezer burn.
Tips & Tricks
- To make it easier to slice the cake, dip a sharp knife in warm water before cutting; this helps to create clean edges.
- For a more intense chocolate flavor, use chocolate graham crackers for the crust, which adds a richer base to the dessert.
- This cake can be made a day in advance; just keep it well covered in the freezer to maintain its freshness and flavor.
- If you want to avoid a mess, place a baking sheet under the springform pan while freezing to catch any drips, which keeps your freezer clean.
Variations
While the classic Buster Bar Ice Cream Cake is delightful, feel free to experiment! Consider these ideas: Check out our related guide for more tips.
- Try different ice cream flavors like mint chocolate chip or strawberry for a twist on the original, allowing you to create a unique dessert that suits your tastes.
- Incorporate a layer of caramel sauce for an extra layer of sweetness, which complements the chocolate beautifully.
- For a festive touch, add seasonal toppings like crushed peppermint candies or sprinkles, making this cake perfect for holidays or celebrations.
Serving Suggestions
This cake serves beautifully as a standalone dessert, but you can also pair it with fresh berries or a scoop of extra ice cream on the side for an added touch of freshness. A drizzle of warm chocolate fudge sauce right before serving enhances the experience, making every bite divine.
FAQ
Common questions about the Buster Bar Ice Cream Cake include:
- Can I use store-bought whipped cream? Yes, but homemade whipped cream offers a fresher taste and better texture that truly elevates the cake.
- How long can I keep the cake in the freezer? The cake can be stored for up to a week, but it’s best enjoyed fresh to appreciate its full flavor.
- Can I make it gluten-free? Substitute the graham crackers with gluten-free options, ensuring that everyone can enjoy this delightful dessert.
With its rich chocolate flavor and creamy texture, the Buster Bar Ice Cream Cake is sure to be a hit at your next gathering. Serve it up, and watch as smiles light up the room, creating memories that last long after the last bite.
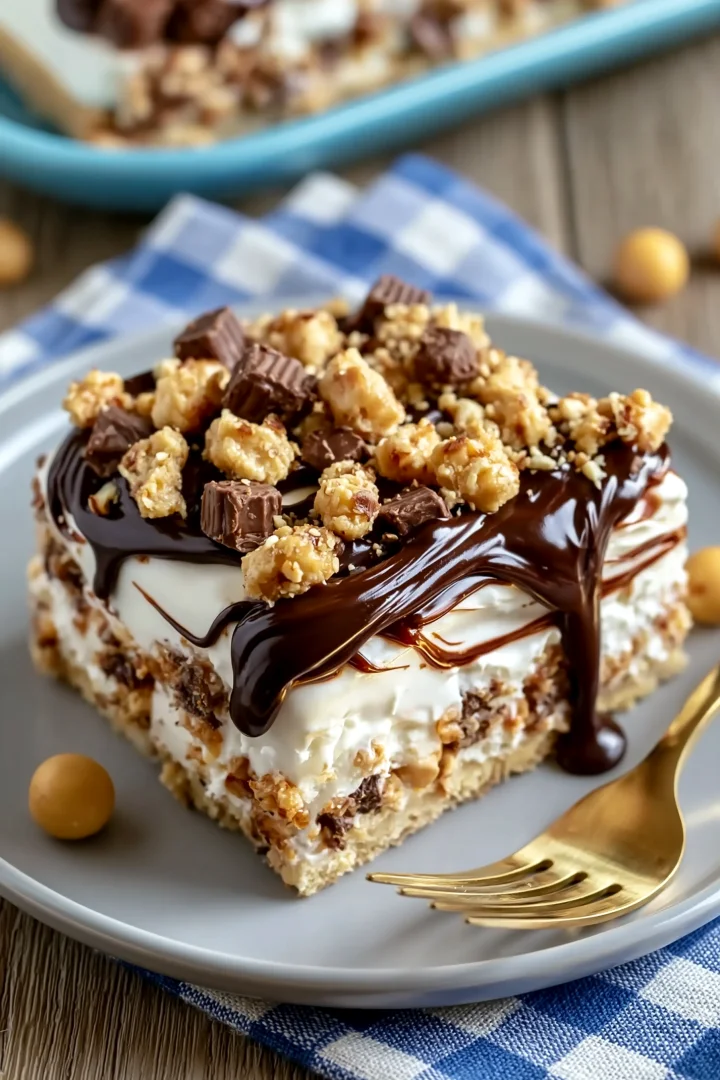
Buster Bar Ice Cream Cake
Indulging in a slice of Buster Bar Ice Cream Cake is like taking a delightful journey back to childhood, bringing forth memories of warm summer days and family gatherings. This dessert, inspired by the classic Buster Bar ice cream treat, combines layers of rich chocolate, creamy ice cream, and crunchy toppings that create a perfect balance of sweet and salty. The beauty of this no-bake ice cream cake lies not only in its luscious flavors but also in its easy preparation, making it an ideal addition to any dessert party or festive occasion.
Ingredients
- 1 cup of graham cracker crumbs
- 1/4 cup of unsweetened cocoa powder
- 1/2 cup of unsalted butter, melted
- 1/4 cup of granulated sugar
- 4 cups of your favorite ice cream (vanilla, chocolate, or a combination)
- 1 cup of chocolate fudge sauce, plus more for drizzling
- 2 cups of heavy whipping cream
- 1/4 cup of powdered sugar
- 1 teaspoon of vanilla extract
- 1/2 cup of chopped nuts (optional)
- 1/2 cup of mini chocolate chips
Directions
In a medium bowl, mix together the graham cracker crumbs, cocoa powder, melted butter, and granulated sugar until well combined. The mixture should resemble wet sand.
Press the mixture into the bottom of a 9-inch springform pan evenly and refrigerate the crust for 30 minutes to set.
Remove the crust from the refrigerator and scoop half of the ice cream into the pan. Spread it evenly over the crust and drizzle half of the chocolate fudge sauce on top.
Return the cake to the freezer for about 2 hours or until the ice cream is firm.
Once the first layer is firm, add the remaining ice cream over the fudge sauce and smooth it out. Drizzle with the remaining chocolate fudge sauce.
Freeze the cake for another 2 hours until completely set.
In a large bowl, beat the heavy whipping cream, powdered sugar, and vanilla extract until stiff peaks form.
Once the cake is frozen, remove it from the springform pan and spread the whipped cream evenly over the top and sides of the cake.
Sprinkle the chopped nuts and mini chocolate chips over the whipped cream. Drizzle with additional chocolate fudge sauce.
Slice and serve immediately. Store any leftovers in the freezer for up to a week.
Nutrition Facts
Recipe Reviews
- ★★★★★
Excellent recipe!
Leave a Reply
Your email address will not be published. Required fields are marked *

Excellent recipe!